Today, I want to share with you a comprehensive guide on how to update the BIOS of the ASUS ROG Strix B550-F Gaming WIFI II Motherboard which is a popular choice among gaming enthusiasts for its performance and connectivity options.
Maybe you’re thinking about upgrading to a newer CPU like the Ryzen 5000 series or the latest-generation Intel processors, but your motherboard needs a BIOS update to support it. Or maybe you just want to squash some bugs and get things running smoother. I’ve been building PCs and tinkering with PCs for a long while, and trust me, updating your BIOS can help in that department for sure.
What is BIOS?
BIOS is the software at the core of your Motherboard, the first code that runs when you power on your PC. It initializes your hardware before handing control over to the operating system.
Why Update the BIOS of Your MotherBoard?
Updating your BIOS can fix bugs, make your motherboard play nicer with newer hardware (like the latest CPUs), and sometimes even squeeze out more performance.
Is it dangerous to update the BIOS of my Motherboard?
With the correct precautions and following instructions carefully, updating your BIOS is safe and often recommended.
How often should I update my Motherboard’s BIOS?
There is no hard and fast rule but keeping an eye on updates every few months is a good practice, especially if you’re experiencing hardware compatibility issues or performance hiccups.
Preparing for BIOS Update
Now Let’s talk about some steps you need to take to get ready to flash your Motherboard with updated BIOS.
Identifying Your Motherboard’s Current BIOS Version
First things first, you need to know your starting point. This involves delving into your current BIOS and noting down the version (writing down on an actual piece of paper is recommended but taking a picture using your phone is also a good option).
- Restart your PC and pressing the designated key to enter BIOS setup (usually F2, Del, or Esc) will get you there.
- Once in, navigate to find your BIOS version—it’s important to ensure compatibility with the update you’re about to apply.
Backup Your System
Before we proceed, let me emphasize the importance of backing up your system. BIOS updates generally go off without a hitch, but it’s better to play it safe. Use your preferred backup method to secure your data.
How to Flash BIOS of ASUS ROG Strix B550-F Gaming WIFI II Motherboard?
Using ASUS EZ Flash Utility
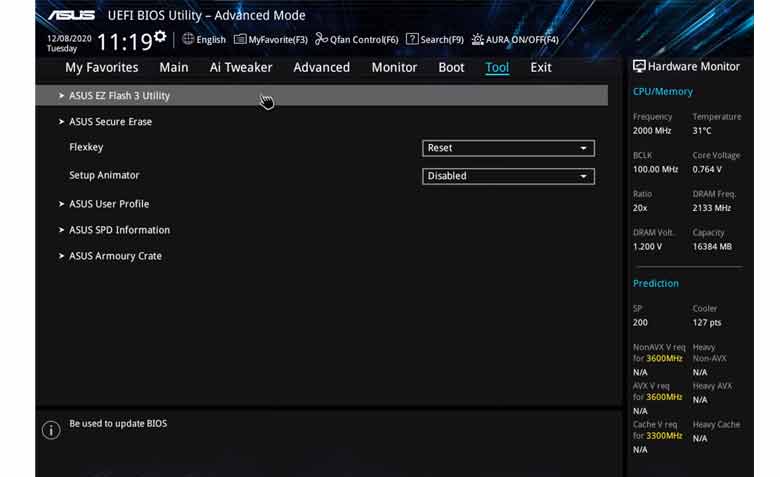
The ASUS EZ Flash Utility is your go-to method for a hassle-free update. Here’s a brief run-through:
- Access your BIOS during system startup.
- Navigate to the ‘Tool’ menu and select ‘ASUS EZ Flash Utility’.
- Follow the prompts to select the BIOS update file you’ve previously downloaded on your PC and confirm compatibility with your motherboard version.
Using a USB Flash Drive
For those who prefer a more manual approach or if your motherboard doesn’t support updating through the Internet directly:
- Download the latest BIOS update from the ASUS website onto a USB drive.
- Reboot into BIOS, and select the USB drive as the source for the BIOS update file in the EZ Flash Utility.
Can I update the BIOS of my ROG Strix Motherboard without a CPU installed?
You can update the BIOS of your ROG Strix B550-F Gaming WIFI II Motherboard without a CPU by using the BIOS Flashback button and USB port on the Motherboard I/O.
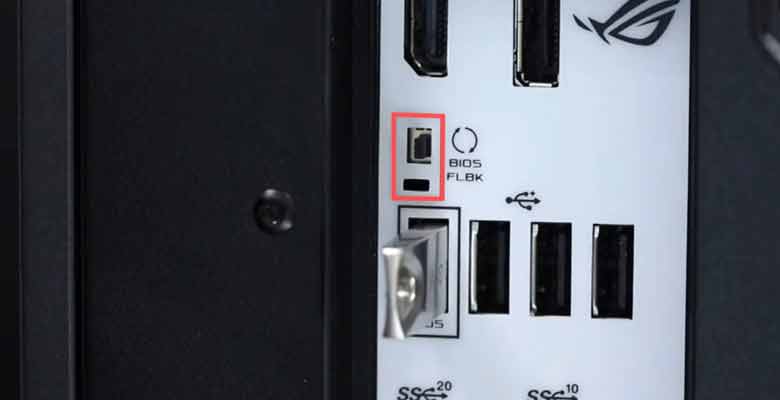
When you are using this feature, make sure the USB is formatted in FAT32 file format and there is NOTHING else other than the BIOS update file on the USB stick.
From there, follow these simple steps:
- Plug in the USB in the BIOS flashback USB port.
- Make sure the power to your PC is on.
- Press the Flashback button on the I/O of your motherboard for 3-4 seconds till the light in the button starts blinking.
- Once the light starts flashing, don’t touch the button or the USB again till the light stops blinking.
- It will take around 15-20 seconds for the light to stop blinking and when it stops, that’ll mean the BIOS of your motherboard has been updated.
Pro Tip: If the Lights on your motherboard are on, that means it is powered and you can proceed with the flashback.
What does it mean if my BIOS flashback light doesn’t stop blinking after 5-10 minutes?
If the BIOS flashback light doesn’t stop blinking in 5-10 minutes, that means that the motherboard has not been able to identify the BIOS file on the USB stick and maybe you need to rename the file or start over, maybe download a different BIOS file to flash.
Pro Tips for a Successful BIOS Update
Ensuring a Stable Power Supply
An interruption in power supply during a BIOS update can be disastrous. Make sure you’re plugged into a reliable power source. If you’re on a desktop, consider a UPS as an extra precaution.
What to Do If Something Goes Wrong?
If something doesn’t go as planned, don’t panic. The PC-building community is incredibly supportive, and I’ve personally found solutions to tricky situations on forums and discussions, especially on platforms like Reddit.
Can I Downgrade the BIOS of my ROG Strix Motherboard?
Depending on the Version of BIOS you are using or have upgraded to, you may or may not be able to downgrade the BIOS on your motherboard, check EZ Flash to see whether it’s possible to downgrade.
Alternatively, you can contact the ASUS Service Center for more help if you are unable to Perform a Downgrade. I would advise against trying to downgrade the BIOS of your motherboard if you aren’t having problems or issues with it.
Conclusion
So there you have it, a straightforward guide to updating your ASUS ROG Strix B550-F Gaming WIFI II Motherboard’s BIOS. It’s not the most important task in the world of PC building and gaming, but it’s important for keeping your system running smoothly.
Especially if you are upgrading your CPU. Plus, it’s not that hard, especially if you follow these steps.